While fields tend to have little effect on games ruleswise they do have an immediate visual effect -miniature gaming is a visual hobby after all. Regular fields and poughed ones were needed.

Building the fields was straightforward enough.
Note: first make a test piece to see how the process works for you after which do a big pile at one go.
For bases you need hardboard and itis cut to preferabe sized pieces. You might be able to have this done for you at the store for a small fee (recommended!), but ours were leftover pieces from our 1808 project. Making the pieces too large is sure to cause excessive warpage and smaller pieces offer more versatility so Janne had opted A4 and A5 sizes for the fields.
If you saw the hardboard to suitable size collect the sawdust. Do the same when you round the edges a bit with sandpaper.
You can make some shallow diagonal cuts with an utility knife to the bottom of the pieces in order to lessen warpage. Be advised that when you try to bend such cut pieces after warping they'll be even more prone to breaking. So always bend such pieces gently!
Ploughed fields are much easier to do than regular fields so let's start with them.

You need:
-suitably textured wallpaper
-sand
-PVA glue
Cut from the grooved wallpaper pieces that ar ethe same size as your hardboard pieces. Then remove some 5mm or so from one long and one short edge so that the wallpaper most certainly will be smaller than the hardboard it'll be glued to and there's no overlap.
Slap some somewhat thinned down PVA to the hardboard and place the wallpaper on it. After a short while you might want to check the pieces and iron out any major wrinkles with your fingers.
When the wallpaper is dry apply some ever so slightly watered PVA to one side of the field so it covers the edge of the wallpaper as well as the side of the hardboard. Dip into sand and repeat with other sides. Naturally if you prefer other scenic products to sand you should use those instead! Let dry until at least this has begun to dry.
Make a thinnish mixture of PVA, water, sand and the sawdust you collected earlier on and slop some on top of the wallpaper to give it more texture. Let dry throughly.
After this you need to paint the pieces. We started it with giving the fields a black basecoat spray after which just used interior acrylics because their obviously much cheaper than the hobby variety. One or two drybrushings with lighter shades should suffice.

With the regular fields you need slightly more stuff:
-uncolored coconut fibre doormat
-some thinnish (1 mm) cardboard
-sand
-PVA glue
-hot glue gun
-some (ready to use) filler
The biggest problem involving a field with crops is that your miniatures won't be able to trample it as would happen in real life when peole run about in fields. The figures will be standing on top of the field instead and this'll look dumb.
Some years ago there was an article about making fields probably in WGI and we lifted the idea for our fields. You need to make a hedgelike frame for the field and separate contents for it. Cutting the contents to several pieces will enable you to remove just what you need in order to place the figures on the field.

Locating suitable doormat might be difficult as most seem to be printed with bizarre designs or garish texts. In desperate situation we imagine those could be painted over but we'd assume that this would be such a bother that we haven't tried it out.
Optimal doormat would come with thin (2-3mm) rubber bottom, but we didn't find any such had natural colored fibre. Tough! Anyhow, such doormat would need little else than just cutting it up to suitable sizes. Anyone who knows where such doormats can be purchased, please DO NOT hesitate to contact us! (gemigabokATthe-ancients.com)
The most suitable doormat we located was Trampa from Ikea costing some 10 euros. On the sides of the bottom Trampa has a really thick layer of rubber or somesuch making those areas unusable, so first you need to cut them away with an utility knife.
Now use one hardboard terrain base as a guide and draw the outlines to the bottom of the doormat with a felt tip pen. Cut away with utility knife. From this piece you first need to cut the edges (~1,5 cm) away to make the frames for the field.
If using Trampa or other doormats with no separate bottom material, glue the non-framing pieces to the thin cardboard with PVA (or hot glue gun if you want to avoid warpage). This is to avoid excessive breaking of the pieces during further cutting.
When at least somewhat dry (after one day the PVA was still somewhat soft, but after two days a bit too hard) remove the excessive cardboard. Then cut the piece in two. Then cut the other of these halves in two. You might even want to cut one such quarter into two. Most probably you need to cut some excess off each piece in order to make them fit your framed field -you could do so while the piece has only the frame removed.
When dry, use filler to mask outlandisly big gaps and paint the filler/cardboard with suitable earthen colors.
During cutting collect the coconut fibre that comes off. Apply watered down PVA to the hardboard and sprinkle some of this fibre to it. After it had dried, basecoat it with black spray but no need to paint yet unless you really want to. This'll represent the trampled down crops when interior pieces are removed from the field to make room for the figures.
Using hot glue gun fasten the field's frame pieces to the sides of the hardboard leaving 1-2mm empty on the sides. If you have some big gaps use some filler to fill them.
Apply some ever so slightly watered PVA to one outer side of the field (between the frame and the edge) and dip into sand and repeat with other sides. When dry, paint the sand green. Naturally if you prefer other scenic products to sand you should use those instead! Paint interior area of the field with suitable earthen colors with one or two drybrushings.
If you make several fields it is most likely useful to mark with a felt tip pen each fieldpiece and hardboard so you'll be able to locate the right pieces for each field even if these get mixed up.
Finally our field revue starts with a platoon of 28mm Bicorne Swedes/Finns painted as Savo Infantry pressing onwards with some skirmishers up front. Trampa is definately best suited for 28mm action!


Moving on to more modern Finns, here an armoured car is speaheading the 20mm Finnish advance. (The soldiers are converted plastic Germans and Russians from various manufacturers).


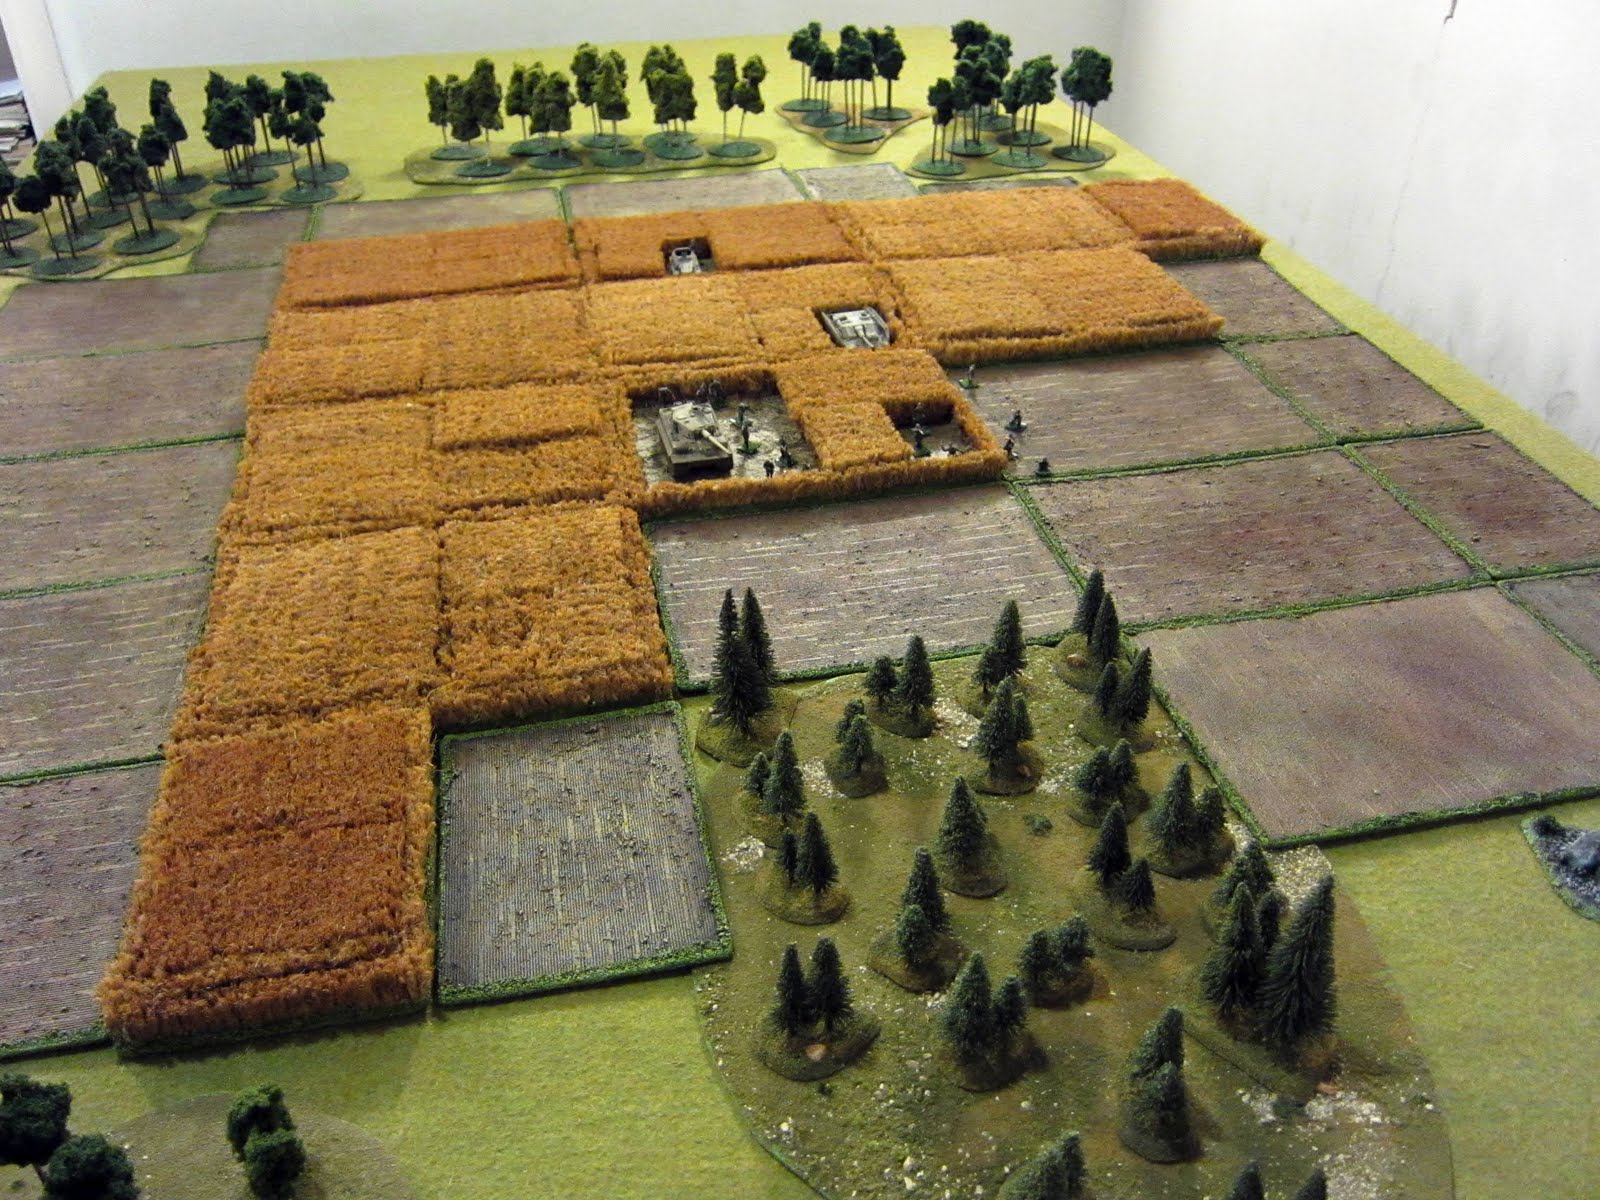
And finally we have some tank supported 20mm German infantry making headway through the fields.

-Janne
("Played": January 24rd. GM: Janne. Faithful handyman: Mr H.)